If you are used to Docker you know that containers are stateless. It means that if you shut it down or spawn new containers, anything you wrote to disk will be gone. That’s one of the reasons a lot of people just write stuff to S3 buckets instead.
But what if you are hosting your own database? or your own Nginx caching layer? Or if you want to save your files directly to disk for performance/security reasons?
EBS & EFS volumes
Until ECS Platform Version 1.3, I believe you could only attach EBS volumes to your containers, and only after the release of the platform version 1.4 you could get EFS volumes attached to your docker containers. Make sure you understand the differences regarding performance, costs & limitations before choosing between them.
For the sake of example, I’m going to show you how you can attach an EFS volume on a Docker Container using AWS ECS Fargate using Terraform.
The Nginx cache folder is /nginx/cache so it will be our mounting point.
99% of you might not deal with this problem but sometimes the given limitations imposed by ECS Docker Environment might not be compatible with your needs, which in this case is nofile=1024:4096.
Security Groups
Another, not so obvious configuration that you need to pay attention to is the fact that the security group you are using between your EFS volumes & your application (Nginx), needs to have an ingress rule, that allows TCP traffic on port 2049 which is the standard on AWS.
Without this, your fate is to deal with all kinds of networking errors with tons of error messages that don’t explain what is going on and your mount won’t work.
What now?
When your Nginx containers boot up, the caching layer will be cached between them regardless of how many containers you have. The same use case can be applied to whatever use-case you might have.
This use case might be shitty but the example is still valid if you need any sort of long-term persistence and shared state between containers.
If you are thinking about or never heard that building completely serverless APIs was possible? This post is for you. I’m going to compile a few lessons I’ve learned in the past 3-4 years while shipping a few production projects and dealing with no servers at all.
(\___/) ( ͡ ͡° ͜ ʖ ͡ ͡°) \╭☞ \╭☞ Follow me on Twitter!
Be advised
Most of what I’m going to talk about here in this post is heavily dependent on AWS. AWS has been my cloud of choice for at least 8-10 years so If AWS isn’t what you are looking for you will be profoundly disappointed with this article. :’)
How does it work?
For all the things I’ve tried, I’ve found only two Libraries & Frameworks that can produce a “good enough” outcome from the point of maintenance.
API Gateway
Before moving into more detail, it’s important to know that at the moment, the only service available to truly serverless APIs is AWS API Gateway. So regardless of which library you choose they will always leverage the usage of API Gateway & Lambdas. API Gateway is the AWS attempt on the Sidecar gateway pattern.
The sidecar gateway pattern deploys the gateway as an ingress and egress proxy alongside a microservice. This enables services to speak directly to each other, with the sidecar proxy handling and routing both inbound and outbound communication.
In other words, API Gateway was made to be pretty much a wrapper on top of all your microservices. You can create a completely different API interface on top of your existing APIs, changing responses and resources, and all sorts of things. But there is one feature that is particularly powerful if you want to build serverless APIs which is the ability to proxy requests from an endpoint to a lambda function.
From the creator of Express, Mocha, Koa, and gazillion other open-source projects. It introduces a more maintainable design to the table for 90% of people. After deployment, your stack will look like this:
Up deploys an API Gateway interface for you, using a {proxy+} resource, add a network proxy in between, and forward all your incoming requests to your lambda function seemly. The good thing here is the “network proxy” in between, give us the ability to create an application that looks like an actual app and not a Lambda (no handlers, etc). For example, your API could still be a fully-fledged Express API and you wouldn’t even notice.
With the Serverless Framework, you can use a combination of plugins that can help you to create the API Gateway endpoints and proxy them to lambda functions, and your stack would look like this:
So you want to have a more “granular” control over the resource allocation, tech language behind each Lambda function, your best bet would be the Serverless Framework. It deploys one lambda function individually for each API endpoint you have. I personally don’t use it much as I prefer Up for most of my use cases.
Which one is better?
I use Up in most cases. Mostly because your code looks exactly the same as a regular application, it doesn’t look like you are writing a Lambda function so there is no development friction within your team, and if for any reason, you decide to move on to a containerized application you can do it pretty easily since you won’t have to change anything on the code itself so no heavy architectural change.
“If you are on a crossroads between two equality good options, pick the one that it is easier to change in the future.”
Someone smarted than me which I don’t remember
Serverless Framework is that bazooka we sometimes hear about. it looks like a Boeing dashboard with so many options and features. It’s great if you want more flexibility and you know what you are doing 🙂
When to use it?
Since there aren’t servers involved, this type of stack is known for being able to handle crazy levels of concurrency & throughput so If your API has unpredictable request spikes which are harder to deal with auto-scaling or without having to throw money at the problem, this could be your solution.
Background Job processing. I know it sucks but sometimes, jobs have to do API calls ¯\_(ツ)_/¯. If you have tons of jobs to process at a small period of time, and you don’t want to bring down your services, this stack can be useful.
Side projects. It is extremely cost-effective and great to deploy your ideas in a matter of minutes. Who wants to pay 10-20$/month for something that you don’t even know if’s going to work, right? Paying per-request is a good morale booster if you still couldn’t find the courage to ship your idea because of monthly costs.
Be Aware
If your API depends on native binaries, packaging your application might become tricky since you need to pre-compile all of them and add them to your lib/ folder before deploying it. In that case, unless you are experienced with compiling custom binaries… managing containers might be easier and unless your like pain and suffering.
Keep your APIs slim. Your bundle can’t exceed the 500MB mark in size. (unless you have binaries, this is pretty hard to achieve).
Common Issues (and How to Fix them)
Cold Starts
If you are not using this stack for a user-facing API, you might want to skip this one.
There is an inherited characteristic when you use Lambda functions which is what people call “cold starts“.
As concurrency increases, AWS keeps increasing the amount of “warmed” lambdas that are able to handle your traffic but not for too long if you don’t use it.
So if you have an API that doesn’t get used too often, without reserved concurrency you can sometimes experience an increase of response time which is a new lambda booting up to handle your current currency demand.
How to fix it?
If you are managing just lambda functions or using the serverless framework, you can fix it with “reserved concurrency”. It’s an option available on your lambda configuration and AWS will make sure all lambda calls go through “warmed” lambdas. Reserved concurrency is charged extra.
If you are managing APIs (using Up), this is where it gets tricky:
When Lambda allocates an instance of your function, the runtime loads your function’s code and runs initialization code that you define outside of the handler. If your code and dependencies are large, or you create SDK clients during initialization, this process can take some time.
This means that since the Up owns the handler, only the handler gets “warmed up” and the function doesn’t really initialize so you have a few options:
If you have a monitoring tool like Apex Ping, you can configure it to ping your API and keep it warm for you.
If you need a specific amount of concurrency, you can either write a code that concurrently “pings” your API every X minutes. It will keep X containers running for you and ready to handle the traffic. If you don’t want to do that… using Up Pro, you can configure the concurrency you need and it will keep it warm for you. Up Active Warming is billed normally without paying extra.
If having cold starts is not an issue but you just want to reduce the cold start time, using a combination of reserved concurrency and increasing the amount of memory of your lambda can reduce your cold start in half or more.
Blowing up Database Connections
Lambdas are designed to handle one call at once, isolated, so no concurrency in between calls. It means that if you call a lambda function twice in parallel it will spawn two different lambdas and handle them independently. If you call it again it means you have two warmed lambda on the “pool” and one of them will be “re-used” without creating another one (no cold starts). It means that if your environment has crazy levels of concurrency like 1000 API calls at the same time it means that you might have 1000 clients connected to your database just to handle 1000 API calls. Not good. If you misconfigured your connection pool with like, 10 connections per lambda you would have 10k database connections at once. (╯°□°)╯︵ ┻━┻.
How to fix it?
Serverless Databases: If you can, use a serverless database like DynamoDB it will work just fine because you don’t keep active connections to your DynamoDB.
Amazon RDS Proxy: If a serverless database is not an option, AWS offers you an RDS Proxy which you can configure directly from the AWS console. https://aws.amazon.com/blogs/compute/using-amazon-rds-proxy-with-aws-lambda/. It means that this proxy will manage the connection pool for you without creating tons of new ones on your database as concurrency increases.
Performance Issues
One thing that isn’t obvious at first is: You can’t configure the amount of CPU allocated to your Lambda function it’s all about getting the right memory settings for your use-case.
When you scale up the amount of memory your lambda needs, it also increases the amount of CPU, networking performance, and so on. It means that your Lambda might be ok memory-wise, but could have its performance drastically improved by just increasing the amount of memory allocated to it.
If you think that the reason why you are having performance issues is code-related, you can set up X-Ray for your lambda function and identify the bottleneck.
Native Binaries
All Lambdas Runtimes are built on top of the Amazon Linux Images. This means that, if your project uses native binaries, once they get compiled on your local machine they might not be compatible with the Lambda Runtime which is based on the Amazon Linux AMIs.
If that’s your case, Docker is your friend. You can use a combination of Docker Compose + Amazon Linux images to build your dependencies before packaging and deploying your app.
Managing Secrets
At this moment, Lambda doesn’t natively support the injection of secrets as environment variables. If you are using Serverless Framework, all you can do at this point is adding them to Secrets Manager or Parameter Store and read them when your lambda boots up using any AWS SDK available. Make sure you do that outside of the function handler.
If you are using Up, you can just use the up env and it will be handled for you on a per-environment basis. (Under the hood, also managed via Secrets Manager).
Testing Locally
If you are using Up, it wouldn’t be a problem since you would just start your app normally. But if you are using Serverless Framework you can follow this in-depth tutorial from AWS teaching you how to simulate the lambda environment locally using SAM.
Wrap Up
As you can see, when used to solve the right problem, respecting the limitations of the environment, this is a very strong card to keep on your sleeve.
If you faced something different, comment bellow (づ ̄ ³ ̄)づ.
In 2019 WordPress powered 35% of the Internet. 60% of all CMS websites were made using WordPress. Nearly 28% of all e-commerces are WooCommerce Stores. Can you imagine that?
So if you are part of these statistics and run your website, blog, or e-commerce through WordPress, you know how important images are. Images are by far the biggest hit on page speed and a key factor if you want to increase your conversion.
The Sandbox
In order to test effectiveness, I will configure this plugin on my own personal blog. Currently, this is how much data you download if you open the home page of my blog and scroll it down to the end:
Many images. All of them with just WordPress defaults.
The Installation
There is a WordPress plugin called “ImageBoss – Images Up To 60% Smaller & CDN“. You can simply go to WordPress Dashboard > Plugins > Add new and search for “ImageBoss” or You can download the plugin and upload it directly on your WordPress dashboard.
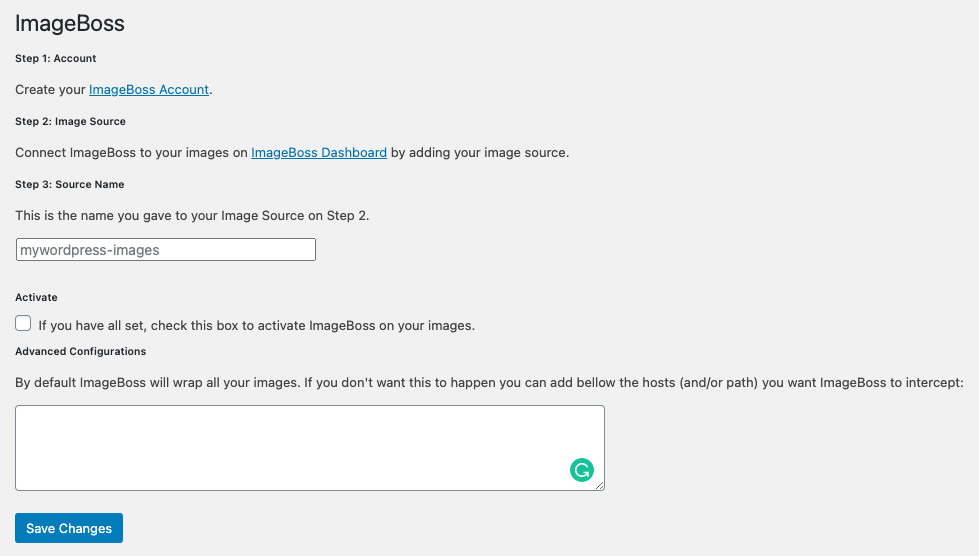
After the installation, you will be redirected to this page:
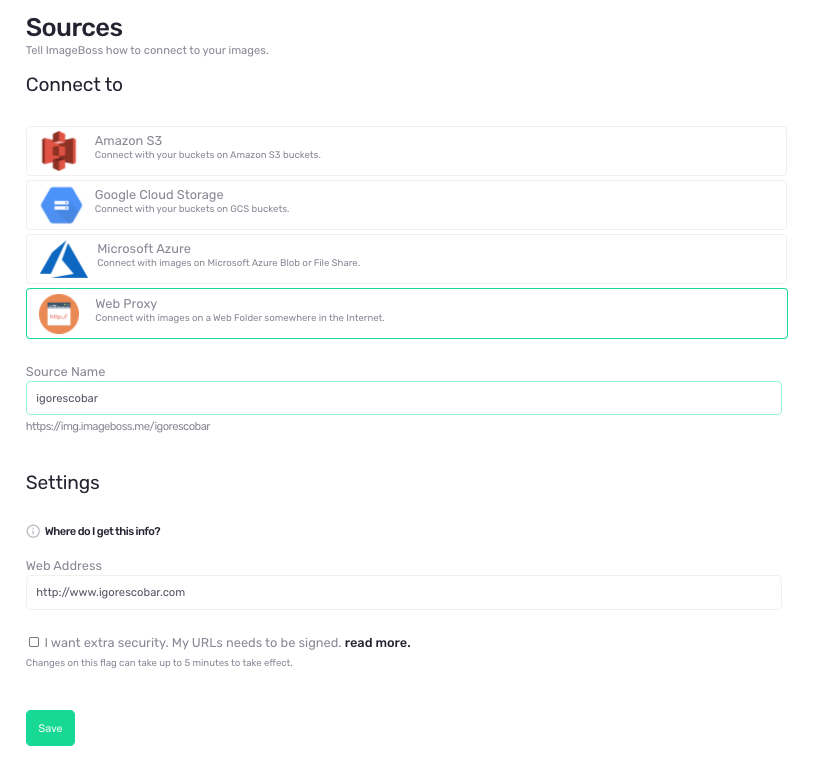
First I need to create my ImageBoss Account and configure my “Source”. Most people will use a source type “Web Proxy”. If you don’t know exactly the URL of your images to set up the Web Proxy Source, you can just inspect an <img> element on your website and see what’s in there:
In my case, all my images go through the same source:
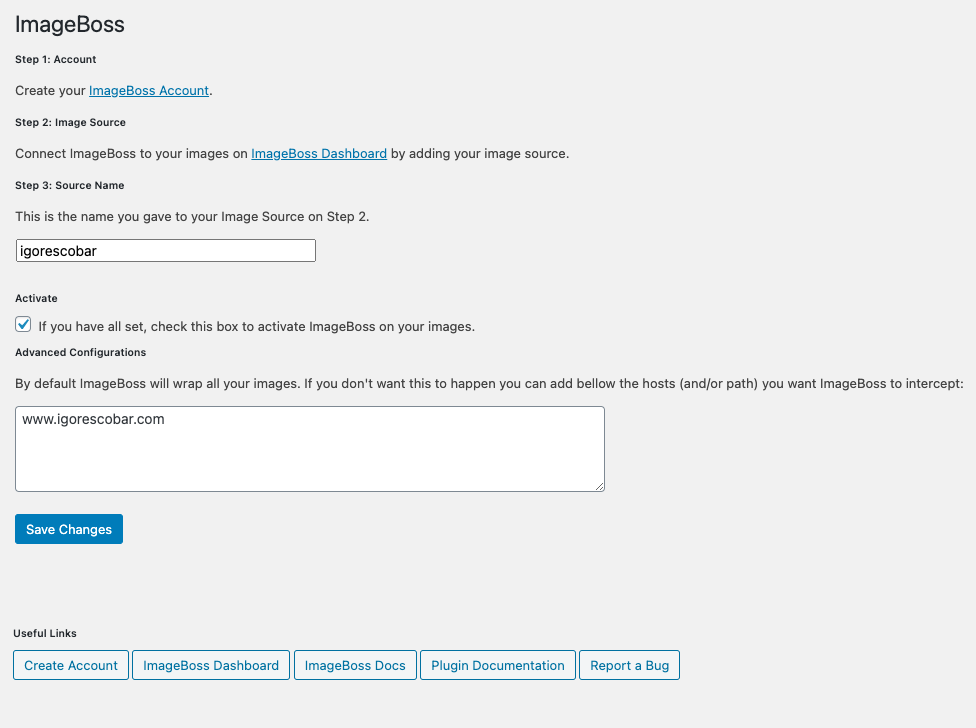
Now, I need to connect the WordPress plugin to the same source:
If you have images from other sources you can just add them separated by a comma.
That’s it!
Now let’s check the results!
The image compression was MASSIVE:
I went from 6.6MB to 1.6MB, which is 73,33% less than my original setup!
On top of that, these are all features of the plugin:
Today we are going to talk about Responsive Images. Responsive Images are a very useful technique to make your designs look good regardless of the user’s resolution screen.
Nowadays when we create our online projects we want them to look good on every device. Desktop, Mobile Phones, Tablets, you name it.
With HTML you can use two different approaches to accomplish this and I will teach you how do implement it and how can you make it cross-browser and make it work with older browsers.
Why Responsive Images?
With responsive images, you can deliver the image with the best fit for your user’s screen. Why deliver a 5MB image when you can deliver a 3kb image for your user that is accessing your website on his phone? Your user will see your content faster, will navigate through your content faster, and will use a lot less bandwidth which will save you a few bucks.
Faster navigation.
Bandwidth savings.
Most of us don’t live in a world where we don’t have to care about 4G data consumption.
Notice in this example I’ve used ImageBoss to crop the smart crop the original image for desktop, tables, and mobile phones. I’ve used it because I not only want to deliver images with proper sizes but they are also compressed and delivered with Progressive Scans.
Notice that you open the code pen above and resize your window the image will change accordingly to your window size.
The <img> element with srcset and sizes attribute
If you don’t like the approach above you can also use the <img> tag with the srcset and sizes attribute.
If you are concerned about how this is going to work on an old browser you can use a very cool project called Picturefill. It will basically wrap the W3C specifications for img and picture with javascript to make it work.
How to generate multiple images for multiple screen sizes?
In this very post, I’ve used ImageBoss to generate the images for all the devices I wanted. I didn’t need to generate all of them by myself and also didn’t need to code anything specific for it. All I needed was to have my image stored somewhere and it did the heavy lifting.
Hello guys. Today I’m going to share with you a very cool project I’m working on. Its main mission is to apply all Web Development Best Practices applied for images and combine them into one simple but powerful API.
It’s called ImageBoss. And my objective today with this post it’s to help you to understand why ImageBoss and how simple it is to do image resizing or image cropping with any kind of image.
First of all, if you have a website (or an app) with posts, news, galleries, or dealing with user-generated content, in general, it can be a huge waste of time if all you want to do is to focus on your business.
Usually, you have to create a new machine and optimize this web service to handle huge payloads, optimize its storage to fast access, increase timeouts to be able to fetch all the information, handle security, conversion, compression, and then you have to code a routine to generate thumbnails and resize your images in all kind of different formats you need (or may need) to be able to beautifully display those images on your app or website. After doing all that, you still need to sign up for a CDN so you can put your assets closer to your end-users to reduce latency and download speed.
It should be the dream, right? but we have to be honest… not all of us have the time, resources, and patience to go this further and do it all over again for each product or client you have.
That is why ImageBoss is here. It does it all for you. Image Resizing, image cropping, image filters, image conversion, and then caching it to one of the most popular CDNs in the world, Cloudflare.
Image Resizing
First of all, to be able to keep up you need to go to the ImageBoss website and set up your account: https://imageboss.me/. (~30secs)
After login in, on your dashboard, you will be able to see this screen:
All you need to do is to add all the sources/hosts that identify your traffic. (You can add as many sites as you want).
Imagine that you want to generate a custom version of that image to be able to show it on a mobile device with 745×200.
In that case, I will use an ImageBoss operation called “cover” with all the default settings. You can read further by following this link: https://imageboss.me/docs/operations/cover
Basically, all you need to do is add a prefix to the original URL:
Notice that ImageBoss has Smart Cropping by default.
Use cover when you want an image with an exact width and height. By default, we’ll run our Smart Cropping algorithm to identify the main subject of the image, so in case we need to remove part of the image to deliver on the requested size, we will always try our best to keep the most important element in the frame.
In addition to all that it auto-rotates my image if necessary and it also converts my image to have progressive scans (progressive JPEG). Now my image is auto rotated, compressed, cached, progressive scans, and globally available to all my users.
I guess that our boring days generating thumbnails manually for every single project is over, right?
The craziest thing that could possibly happen on my professional life as a Software Engineer happened on August 18th, 2016. That day I discovered that I could perform a massive Rick Roll attempt against the US presidential candidate Donald Trump.
The crazy story begins with an unexpected e-mail from a guy named Shu Uesugi – a San Francisco based Engineer currently working for EdSurge – asking for permission to mention my name and share with the world what he just discovered.
After reading his e-mail and his draft I was like:
The short story is that Donald Trump has a donate page which is using my open-source project jQuery Mask Plugin to guide his visitors on the tricky quest of filling up web forms – so far so good.
The shit hits the fan when the developer of his 2MMdollars website decides to include the minified version of jquery mask plugin file pointing directly to the demonstration page of my project (hosted in github.io). I have 100% control over this file and the developer simply injected the file on the page (instead of saving the file on his servers) and I could just replace or inject something nasty in it to make the most ambitious trolling attempt against the US presidential candidate.
Yet, in shock, I decided to share this with my personal friends on Facebook:
In only MY post I got 714 likes, 139 comments and an impressive 262 shares, hundreds of people randomly sending me friend requests, sending me messages on Twitter, Facebook and e-mails… giving me ideas and warning me about the window of opportunity that I got to do something about Trump. People really liked the possibilities of what Uesugi discovered . At the end of the post I asked for ideas of what each person would do if they were in my position – oh boy… that was fun!
All of the sudden I became some sort of super-man with a power that could change the world. People were like… DO IT! DO IT! Say something! Make a beautiful rain of penises with wings upon his website! And I was like… Wow… People really want to say something to this guy…
They even opened a hilarious pull request on their own, pure team work, in attempt to do something and hoping I’d merge it (sadly it was deleted).
After watching all this, receiving all those tweets, messages and emails showing nothing but pure hate love towards Trump. Of course, the bad news spreads fast and in a matter of hours the code on Trump’s website was fixed. People were in tears. e.g:
Then I posted this on twitter:
Yep. At the bottom of your heart you agree with me that this would be wrong. jQuery Mask Plugin is a serious project which took years of hard work and commitment to the community to build its reputation. I can’t just throw it all away for the public’s amusement. To make people laugh. To make a statement against someone – even if this someone is a US presidential candidate like Donald Trump.
The true sad history behind this is that Donald Trump’s website cost 2MM dollars, they are using several open sourced projects like our jQuery Mask Plugin and they don’t even donated 1.00 freaking dollar in our donate pageto support its development.
In this post I’m going to guide you through a step-by-step on how to deploy your Sendy installation using AWS ElasticBeanstalk and Docker. Keep in mind that this is a production ready setup so brace yourself.
The AWS Resources
Here is a list of what you need to do before going ahead.
Create an ElasticBeanstalk Application (e.g Sendy).
Create an ElasticBeanstalk Environment (e.g sendy-production).
You can deploy the Sample Application for now.
Once your environment is created make a note of your Environment ID located on your environment dashboard right beside your DNS entry. (e.g Environment ID: e-xxxxxxxxxxx).
Create a EC2 Security Group to be used by your RDS MySQL Instance (e.g: rds-sendy-production).
Inbound: Open this tab and make sure you allowed your ElasticBeanstalk Instances can reach your RDS. To do so you need to locate the name of the Security Group created by your ElasticBeanstalk Environment. Just go to your EC2 Security Groups Section. And locate the ID of the security group that possessed your ElasticBeanstalk Environment ID.
It will look kind of like this:
You need to do that because your environment is elastic and every new created instance needs to inherit its permission to access the RDS instance.
Create your RDS MySQL instance and attach the EC2 Security Group created on the previous step. Further configurations is up to you.
Create a SSD or Magnetic Volume on the same Availability Zone of your Elastic Beanstalk Environment Instances. Attention to the availability zone or your deployment will fail because EC2 Instances can’t attach volumes outside of its availability zone. After doing that take a note on your Volume ID (e.g vol-XXXXXXXX).
Assuming that you’re already inside your Sendy’s folder you need to create a few files.
Dockerfile
[bash]
FROM php:7.0.8-apache
RUN a2enmod rewrite && \
docker-php-ext-install mysqli gettext
ENV APP_HOME /var/www/html
WORKDIR $APP_HOME
COPY . $APP_HOME
EXPOSE 80
[/bash]
Notice that I’m using the official php + apache2 docker image. I need to create my own Dockerfile because of Sendy’s dependencies like mysqli and gettext.
Ports: By default apache is running on port 80, no big deal here. Volumes: The most important thing to notice on the code above is those “Volumes”. Sendy uses the the uploads/ directory to save everything you upload to its system so it’s very important for you to have those volumes mapped from the Docker Host into your containers to make sure that in case you need to restart your containers you don’t lose your persisted data (docker containers are stateless!).
The /session:/var/www/html/session is because it is where php is saving logged user sessions. Its better to save sessions outside of the application container. It make sure that every new deployment you don’t need to clean your cookies and login again (it sucks, I know!).
01mount: Replace the YOUR_VOLUME_ID_HERE by your Volume ID created before. Also make sure that –region us-east-1 is correct. This file will make sure that we will be using the Volume created earlier exclusive to our uploads and your data will never be lost in case you explode your machine somehow. 02wait: The commend aws ec2 attach-volume is async so we need this otherwise further commands would fail. 03mkdir: Create the /uploads dir in case it doesn’t exists. 04trymount and 05: When you first create a EC2 Volume you need to make sure that it has a file system in it so this is what it does. 06mount: Uses the Volume we created for the /uploads folder.
def has_same_nginx_file_version():
f = open(NGINX_CONF_FILE, "r")
conf = f.read()
ret = re.search(VERSION, conf)
f.close()
return ret != None
def write_nginx_conf_file():
f = open(NGINX_CONF_FILE, "w")
f.write(NGINX_CONFIG)
f.close()
def restart_nginx():
print("– service nginx restart")
os.system("service nginx restart")
def main():
if has_same_nginx_file_version():
print("– already configured, do nothing.")
else :
write_nginx_conf_file()
restart_nginx()
if __name__ == "__main__":
main()
[/ruby]
The file above is necessary because apache runs your application with www-data user and this user doesn’t exists on your Docker Host. And the second file is for overwriting nginx’s beanstalk configuration for accepting upload of bigger files.
includes/config.php
[php]
/* MySQL database connection credentials (please place values between the apostrophes) */
$dbHost = $_ENV[‘MYSQL_DATABASE_HOST’]; //MySQL Hostname
$dbUser = $_ENV[‘MYSQL_DATABASE_USER’]; //MySQL Username
$dbPass = $_ENV[‘MYSQL_DATABASE_PASSWORD’]; //MySQL Password
$dbName = $_ENV[‘MYSQL_DATABASE_NAME’]; //MySQL Database Name
[/php]
.htaccess
Add these to your .htaccess file:
[php]
# for enabling upload of bigger CSV files
LimitRequestBody 104857600
php_value max_execution_time 0
php_value post_max_size 60M
php_value upload_max_filesize 50M
# to avoid session problems originally saved to /tmp.
php_value session.save_path ‘/var/www/html/session’
[/php]
Make sure that you are using environment variables on that file so we can inject them into your ElasticBeanstalk Environment.
Set your database configuration as Environment Variables
Boom! Now make sure that you follow Sendy’s Guide Lines in order to setup your app correctly.
Let me know if you have any questions on the comments section bellow. Maybe some detail is missing and I could add it to the post. Remember! Sharing is caring! ;-D
Hi. My name is Igor Escobar and I’m a Software Engineer at Hole19 Golf. As many of you already know, I recently made a life changing decision of which I would love to talk about with you.
Before going through the why’s, I need you to understand I little bit about me so you can follow my reasoning on why I did leave Brasil.
I started into programming when I was 13 years old. Loved it since the first time I laid eyes on those crazy computer instructions. Did all kinds of crazy computer programs you can imagine and I’ve learned that magical things only happen way out of your comfort zone.
This motto not only tells a lot about myself but also tells a lot about our mindset and the kind of challenges that we are able to pursue. I’ve always dreamed big, always pictured myself out there, living this dream of endless freaking awesome challenges.
A few months ago I stumbled on the opportunity of joining a Portugal based startup called Hole19 Golf. I can tell you that it wasn’t an easy decision.
Some of you would call me crazy for leaving Brasil (some of you definitely wouldn’t), but not everyone has the courage needed to put your entire life upside down… leaving your family, selling everything you once possessed, job, home (~/) and my wife (also a dog) for endless 4 months.
When this kind of opportunity appears in your life you can’t think just about yourself. You need to think about your family, your future, is it worth it? Does Portugal have better safety conditions, education? Will my kids have a better life there? For many of you It may sound like “it’s just a job, not worth it!” but in my head it sounded completely different.
I saw an entire new world opening before my eyes. Portugal in 2016 held the 13th position in terms of Quality of Life right after Finland and United States which holds the 12th position. Portugal has better qualify of life compared with amazing places like UK, Canada, Japan, France, Ireland, Italy and the list goes on! Where is Brasil on that list? 45th place… right next to India, Iran, Pakistan, Singapore etc.
As hard as it may be… For the sake of my future family of 3 kids and two dogs… I really believed that a huge shiny door was opening for me.
It’s been 5 months since I left Brasil and started a whole new life in Portugal as a Software Engineer at Hole19 Golf and I feel morally obligated to tell you about how my life’s going in Lisbon/Portugal and how it’s like to be working for Hole19.
Life in Lisbon/Portugal
Instead of going through all the aspects of living in Portugal I rather talk about a few things that most impressed me on a daily basis.
Safety
When I moved to Lisbon I discovered that I’m a guy who likes to walk around. Day and night. This is impossible in Brasil if you don’t live in a private condo with security cameras, high walls or electrified fences. Lisbon proved to be a very nice place to walk around and discover the city. It felt really safe and you can walk around anytime, day or night, and still get home safe with all pieces in place. Also, if you value living in a nice house close to the ocean or with green areas everywhere, Portugal fits you well and you don’t have to sell one of your kidneys for it or drive for a hundred hours to get to work.
Beauty and people
Lisbon is beautiful and it surprises me every time I go for a walk, day or night. The portuguese are known for being quite surly, but all I can say is that in Lisbon I was always well attended, so I didn’t feel any of that so called rudeness. Of course, you can relate that to the fact that Lisbon is a big city and full of tourists and that influences how portuguese treat visitors.
Pictures above were all taken by me. Most of those places you can visit by just walking around. These are just a few places that I’ve been for this very short period living here. It’s amazing(!).
food
If you think you’re coming to Lisbon and you’re not putting on some extra pounds, you’re wrong. The variety of restaurants here is impressive. And to make it better you eat very well and pay fair prices for it. I guarantee that eating well won’t be an issue for you. This made things easier for me, considering that brazilian food is really good and that my first four months I was living by myself.
weather
For me, this is a huge positive point. Lisbon is cold in the winter but not FREAKING ICE AGE like in other countries and it’s very nice in the summer. The only thing you need to be aware is the pacific freaking cold ocean incluencing the Tejo River.
Public Transportation
In my opinion it works perfectly. We got buses, trams, funiculars, subway, trains and boats. I could go anywhere I wanted using them for very affordable rates.
And these were the aspects that impacted me the most in this time frame.
Life and Work at Hole19
Since the first moment I decided to join Hole19 they started to be like a family to me. They took care of every aspect of my moving to Portugal like documentation, plain tickets, costs, temporary place to stay, everything! They even picked me up at the airport, by the way.
And it’s been like a family ever since. We work and we work hard to connect the world of golf! Together we were able to accomplish amazing things! Even more that I could ever imagine. Our team is incredibly passionate and talented. We are so focused on our mission that you can’t even think about doing poor work – its like everybody is watching and this is amazing!
It really feels like we are all part of a huge mission (it really has been). If you don’t like to work on a world class product used by 1M people, across 154 countries and 14 languages, to create highly performant applications, solve scale issues, work on recommendation/search algorithms, social connections with Graph databases, to process several thousands of requests per second, to deal with payments, (No)SQL/in memory databases, streaming data processing/transformation/aggregation, distributed architectures, math problems, to create technology for mobile/wearable devices, to use the right programming language to solve the problem, to use containers, continuous integration and deployment and to create APIs… this is definitely NOT the place for you.
It has been an exciting ride for me. I’ve always been a guy that thinks that with the right people, hard work and a huge load of passion you can accomplish anything. So I think we’re on the right track.
I’ve been working on a very cool project project here at Vale Presente which was able to provide a smooth interface to our call center attendees increasing their productivity and quality of our costumer service. The project was built with HTML5, CSS3, Javascript and Node.js as our backend engine (only cool stuff!). But the main challenge was finding the right tool to get the job done in a fast and consistent manner. I’m not going to talk about how I built the client. My focus here is talk about the tool I used to create a fast and consistent connection between the attendees and Asterisk. That was tough. There are a lot of libraries available over the Internet but most of them aren’t production ready.
Production ready
During my quest I had the pleasure to meet asterisk-manager. A Asterisk Manager Interface created by Philipp Dunkel which is a node.js module for interacting with the Asterisk Manager API. Nowdays I’m helping him as a maintainer of the project, improving, fixing bugs and helping to increase the project’s visibility. Not just because I’m a maintainer but because it works!
Currently the asterisk-manager module/package for node.js is handling incredibly well more than 500,000 asterisk events and ~5,000 voice calls a day. All of those events are being transmitted to our clients through Socket.io. This is a production ready and tested solution.
How to use it
Pretty simple. First you have to install it directly:
Today I’m going to exemplify a pretty easy way to put jQuery Mask Plugin to run with Zepto.js instead of jQuery.
What is Zepto.js
Basically, you can switch from jQuery to Zepto.js if it’s too heavy or if it’s too much for your current needs. If you need something more lightweight that allows you to keep your code compatible with your old jQuery’s code, Zepto.js is a match for you.
Zepto is a minimalist JavaScript library for modern browsers with a largely jQuery-compatible API. If you use jQuery, you already know how to use Zepto. While 100% jQuery coverage is not a design goal, the APIs provided match their jQuery counterparts. The goal is to have a ~5-10k modular library that downloads and executes fast with a familiar and versatile API, so you can concentrate on getting stuff done.
– Zepto.js Official Web Site
(\___/) ( ͡ ͡° ͜ ʖ ͡ ͡°) \╭☞ \╭☞ Follow me on Twitter!
Zepto’s basic implementation of data() only stores strings. To store arbitrary objects the optional “data” module from custom build of Zepto was included.


 In 2019 WordPress powered 35% of the Internet. 60% of all CMS websites were made using WordPress. Nearly 28% of all e-commerces are WooCommerce Stores. Can you imagine that?


 More Info:


 In this post I’m going to guide you through a step-by-step on how to deploy your
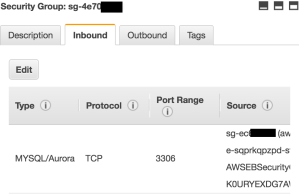


